It fell to me to both create the slides and handle the equipment for the presentation a group of us did off-campus on Monday. The “handle the equipment” part meant lugging around a MacBook, a clicker, a wireless mouse, an ethernet cable (just in case), a vga extension cable (just in case), a flashdrive with all files (again, just in case) and the laptop’s powerbrick. Â Altogether probably seven or eight pounds and bulky.
Actually toyed with the idea of also taking a little Panasonic projector along but didn’t want to add 3 more pounds and juggle yet another bag—although in retrospect I should have since the projector provided by the hotel was a bit of dim bulb (leaving several of my more complex backgrounds in the dark). With nowhere to check equipment at the conference, I was lugging the stuff around all day.
As you might suspect, I’ve been thinking about a better way to handle this sort of thing in the future and think I have a new workflow and equipment strategy.
Workflow
1. Continue producing presentations using Keynote on a Mac. It’s simply better than Powerpoint and I find it offers better tools for designing slides that get beyond producing panes of bulleted text (remember, it isn’t Powerpoint that kills, it’s the bullets). As I’ll get to in a minute, you might also want to lighten up on sophisticated builds and dissolves or maybe not.
2. When complete, export the presentation to a PDF via Keynote’s export function.
Equipment
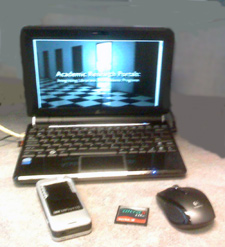 Computer – EeePC S1000. Put Ubuntu-eee on the machine and make sure you have the Evince document viewer installed (it should be there by default). You can use any netbook I’m sure, it’s just that I have tested this with an S1000 running ubuntu-eee. I didn’t use the Xandros distribution of Linux that shipped on the S1000 long enough to know whether it included Evince or a package with similar capabilities…it might have.
Clicker – use something like Logitech’s VX Nano wireless mouse. Gives you a wireless mouse you’ll end up using with your netbook everyday and it makes a really nice presentation clicker (lightweight and the right size).
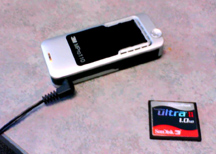
Projector – yes, you can even take a little backup projector along using the MPro110 from 3M. In the cheesy cell-phone picture I’ve added to this post, the MPro110 is the little device to the left of the CF card (included to give some sense of scale).
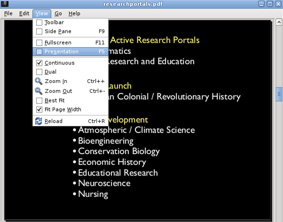
Software – When it’s time to make the presentation, use the Evince document viewer and put it in “Presentation” mode. This way, your first slide fills the screen and a left mouse click will advance to the next one (and right mouse clicks will cycle backwards).
 You will lose dissolves and builds/transitions with this setup (after all, you’re projecting static PDF pages) but you might find you don’t really need them.
If you do, export your Keynote presentation as a Powerpoint file, then call it up under OpenOffice Presentation (2.x) or Impress (3.x) and fix those things that didn’t translate properly (weird font handling, builds, transitions, etc.).
Here’s a tip: Don’t use Keynote’s dissolve transition if you’re exporting to Powerpoint or Impress…it doesn’t translate well.  Instead, skip transitions while in Keynote and wait until you’ve called the presentation up under Impress to apply them. By the way, within Impress you’ll find that “Fade Smoothly” pretty much replicates Keynote’s dissolve effect while the Impress “dissolve” looks like an exploding checkerboard.
MPro110
 So, what sort of projector is the 3M’s new MPro110? Very limited but still an interesting piece of hardware. It weighs just under 6 ounces and runs about 40 minutes on the built-in battery (comes with AC Charger/Power Cord as well). Will support VGA,SVGA,XGA and WXGA (up to 1280×768) but don’t expect a room-filling picture. You have to be within about six feet of the screen or wall you’re projecting upon and at the maximum focus range, I ended up with a projected image that measured about 3 1/2 feet along its bottom edge. At the maximum size, you’ll need a very dark room.
Move the unit closer to the wall and you can project in a brighter space but you’ll still greatly benefit from using a plain, white surface.  In a lighted space, you’ll find you can’t get an image that’s much larger than a 30″ monitor might offer…but that’s still pretty large.
I’m thinking this is the perfect device for libraries to check-out to students working in these new learning spaces everyone’s talking about. I can easily see a workgroup using this to collaborate on a presentation or share a screen. It’s lightweight, very portable, and should stand up to abuse much better than more traditional projectors (the Mpro110 uses an LED for the lightsource, not a $200-$300 bulb).